37 push button toilet flush mechanism diagram
Caroma toilets are known for their unique, stylish designs and quality dual-flush performance. PlumbingSupply.com ® is pleased to offer a variety of parts for these toilets, from outlet (flush) valves and push button flush assemblies to valve seals and inlet (fill) valve repair kits. Just click on your toilet model to find the parts you need to get your Caroma toilet running like new again. standard or hydraulic push button. Sloan Prison Model Flushometers are designed for easy installation and maintenance and come complete with a standard or hydraulic push button actuator, Bak-Chek® control stop, adjustable tailpiece, vacuum breaker flush connection and spud coupling.
Toilet cisterns & flush tanks: This article explains how a flush toilet operates and describes the types, parts, and operation of the toilet cistern or toilet flush tank. This article series describes the different types and models of toilets: historical or old toilet types, wooden high wall-tank toilets, conventional reservoir tank toilets, low-flush toilets, water saving toilets, back-flush ...
Push button toilet flush mechanism diagram
Check the push button toilet flush mechanism diagram for further details. For Water Leakage in the Bowl. This problem occurs if the flush rod is not hitting fully over the tank lid for full flush or the chain is too long. It would be best if you used the cutting pliers to cut the chain length and leave a little part for the flapper to close well. A push button toilet flush can also reduce water consumption and minimise water bills. The range includes buttons designed to fit most popular toilet brands and some lesser-known systems. With a greater surface area, they're easier to clean than standard fittings and are quick and easy to fit. Sort by ... There are many toilet designs; however, most function simply through the natural forces of gravity and a change in pressure. Typically, a toilet will consist of a tank that acts as a storage reservoir for water. Controlling the flow of water to and from the tank is accomplished by using a fill valve and a flush valve.
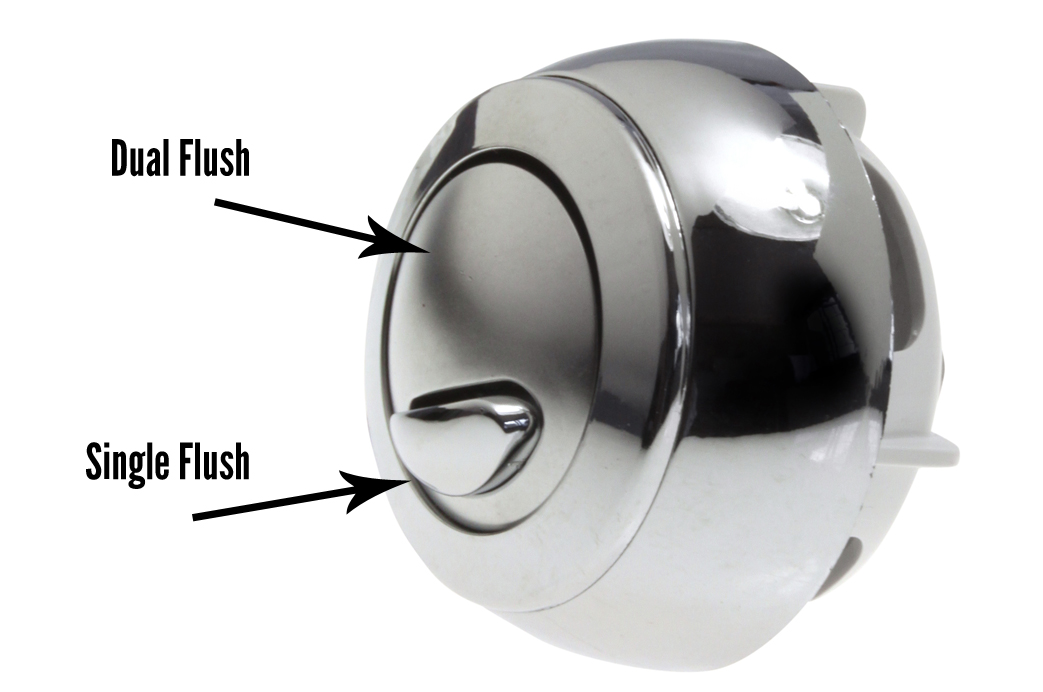
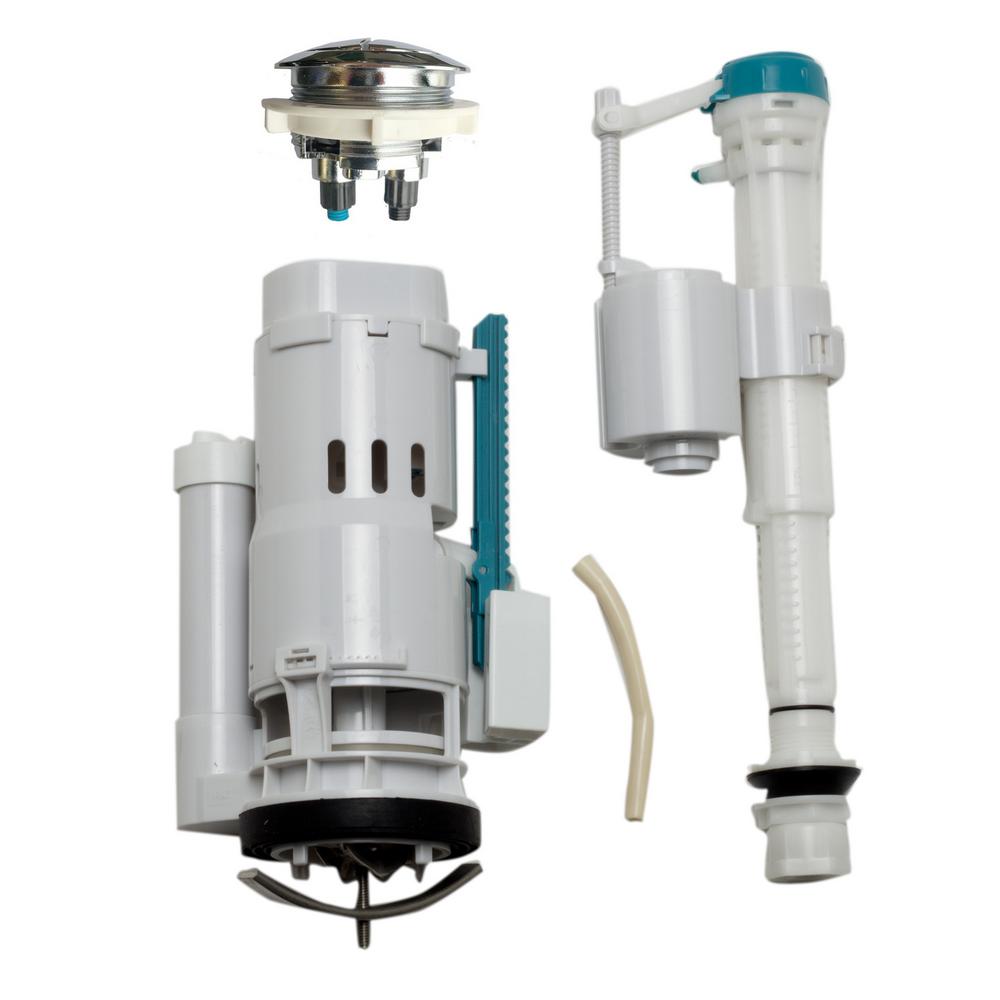
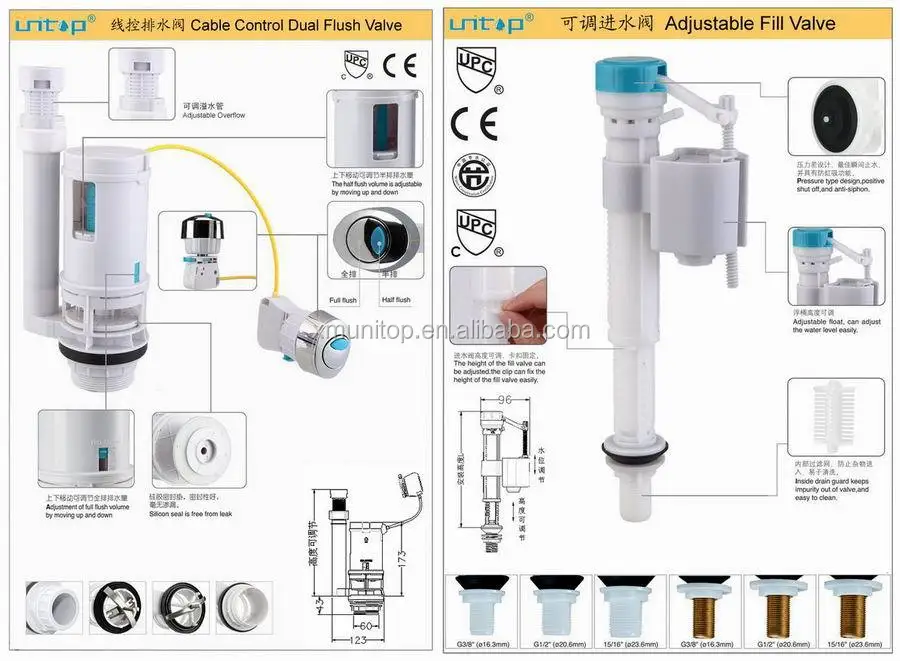
Push button toilet flush mechanism diagram. install flush valve again correctly after adjusted.) 3. Adjust all parts position to prevent them from interference. 4. Open & close for water-stop cup is normal and has no leakage. 5. It is normal for full flush and half flush. VII, Push button Installation VIII , @ ~Push button nut l Full flush ~ sh button f I Ha~ flush push button Screw off push Position flush button (E) on top of the tank lid (D) so the small button with the blue rod (half flush) will align with the green button on top of the flush valve preassemble to tank (B) and the larger button with the white rod will align with the white button (E) in tank lid (D) by hand tightening lock nut (NN). A common problem with toilets is water leaking slowly into the pan. This can be caused by several problems. One potential reason for a slow leak is incorrect... This video will tell you how a to remove and install a push button flush unit on your toilet. How to get a water tight seal and a great flush! We also show y...
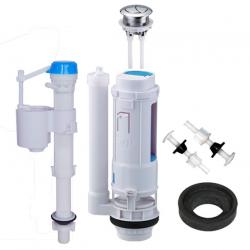
Ideal Standard Studio Lever £27.00. Product Code: TS1528. Quick View. SV81767 Float Valve £20.80. Product Code: TS203. Quick View. Ideal Standard Tulip Lever £43.00. A flushing mechanism comprising: A flushing control: A push-down button or a pull-up knob that releases the flush. An overflow: If the float valve malfunctions, the overflow directs excess water from the cistern into the toilet bowl to avoid flooding the floor. A Push-Button 1 B Flush Valve 1 C Rubber Washer 1 D Backnut 1 E Sealing Gasket (Donut washer) 1 F Inlet Valve 1 G Inlet Rubber Washer Important: 1 H Backnut 1 I Bolt 2 J 2 K Sealing Washer 2 L Plastic Washer 4 M Nut 2 N Wingnut 2 O Cistern Lid 10. To fit the flush button, insert button through cistern lid and secure using 1 P Cistern 1 Q Pan 1 Siamp Optima 50 Toilet Replacement Push Button Flush Chrome. £ 7.44 £ 6.20 Add to basket.
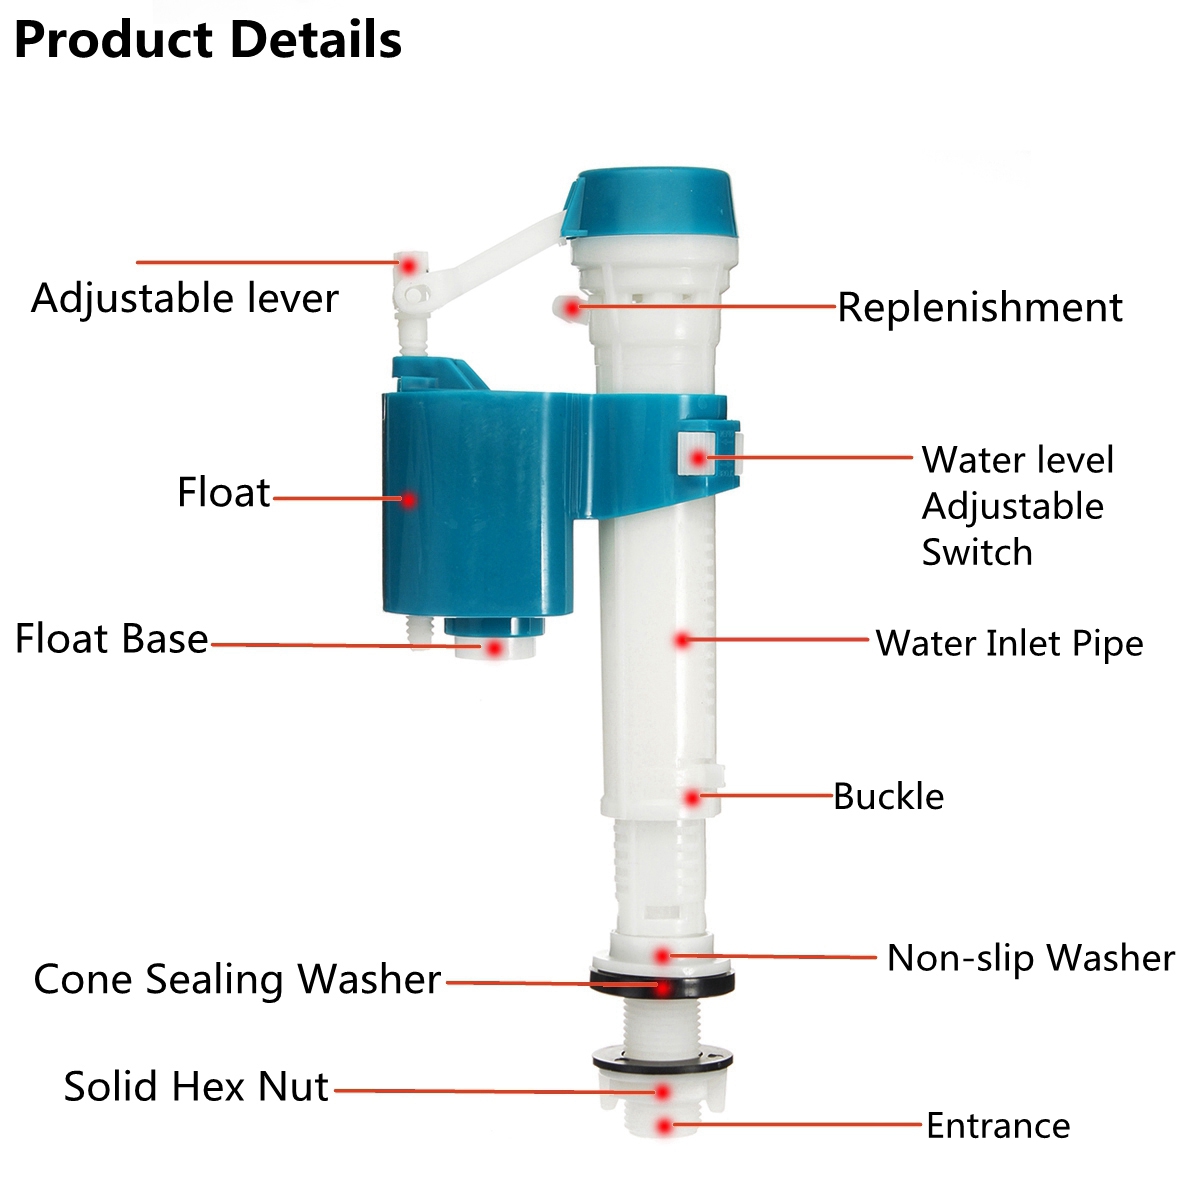
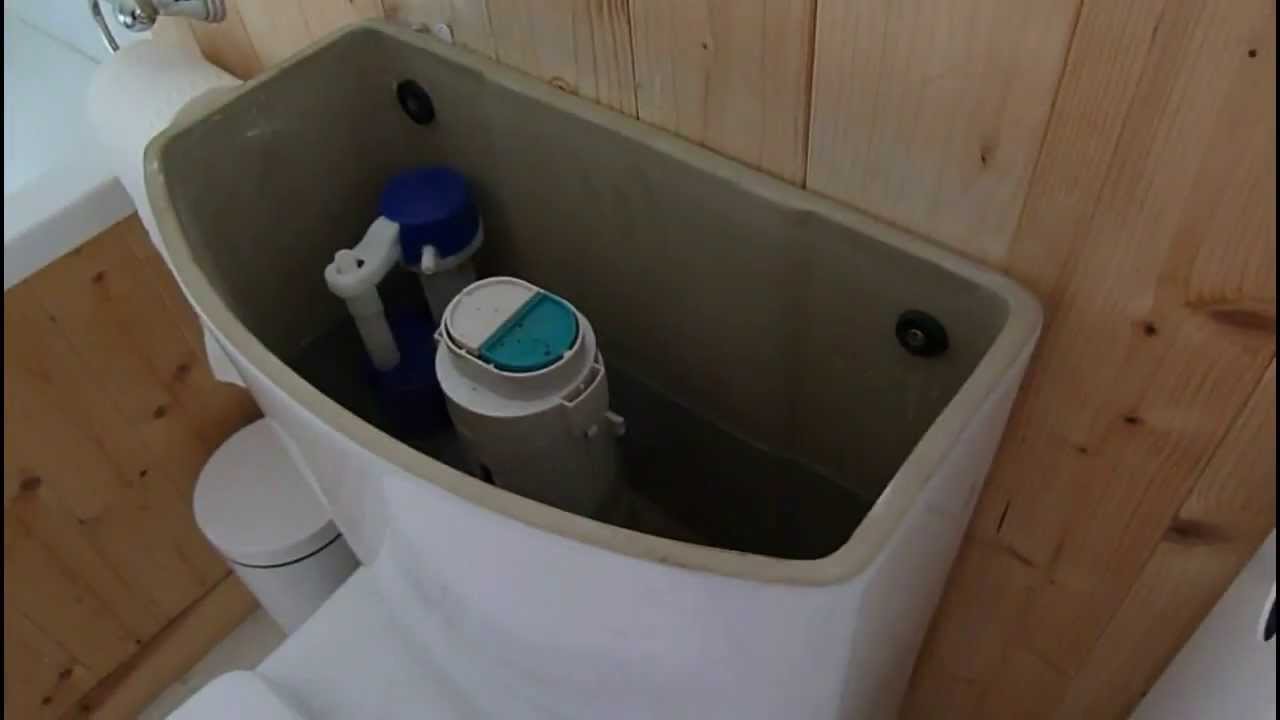
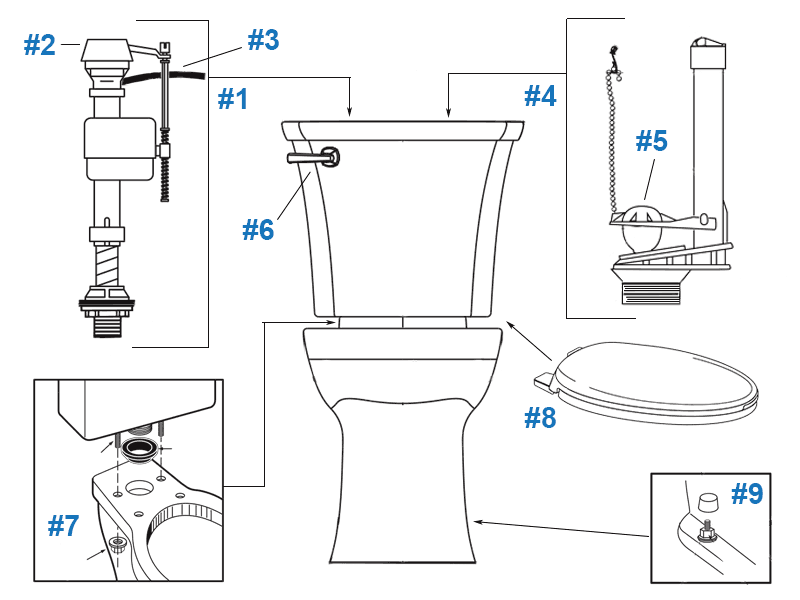
A push button toilet cistern works through the combination of a plastic float and a central plastic outlet valve water supply line. Usually, push button cisterns have two button options for increased water management. The smaller button uses the least amount of water per flush and operates the plastic float. If you own a home, you will eventually need to deal with a leaking toilet, running toilet, or a toilet that doesn't flush properly. And If you're unfamiliar with the Parts of a toilet or don't have a good Toilet tank diagram, you might not know how to fix toilets, or where to start when replacing toilet tank parts. Saves Water: A lever flushing toilet doesn't offer the capabilities to use more or less water. A toilet with a push flush feature usually offers two different water levels, which will ultimately save you money at the end of the day. More Sanitary: It is much easier to spray some disinfectant on a button than to cover every inch of a lever. Step 9. Replace the flush button. Fitting the push flush button is easy. Just unscrew the nut at the back, fit in the button and tighten the nut. If your button comes with a shroud, use it if you like. You can easily discard the shroud if the button fits fine. Connect the button to the system, close the lid and you're done. Step 10.
What type of toilet flush button do i need? | SparesPRO ...
The push button toilet cistern works in pretty much the same way as a traditional handle flush cistern (See our project on cisterns, tanks and valves for more information) in that when a button is pushed it operates the central flush unit by opening it a little way (when you press the smaller button) via a lever attached to the polystyrene ...
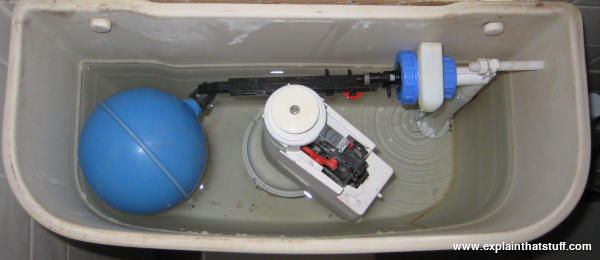
Anyone know what "toilet" part looks like a styrofoam boob?
Push Button Cistern Spare Parts. Here you will find a comprehensive range of the countries most popular toilet spare parts by the biggest manufacturing names in toilet spares. If your toilet flushes by pushing a toilet push button then you will more than likely find that button and the rest of its working parts here in our push button cistern ...

Audio mixing table
Flush Mechanism Push Button Switch. Flush Mechanism Push Button Switch * Suitable for Toilet fittings/ cistern fittings * ABS single control push button with chrome plated. * Diameter: 38mm,48mm,58mm * Shape: sqaur...
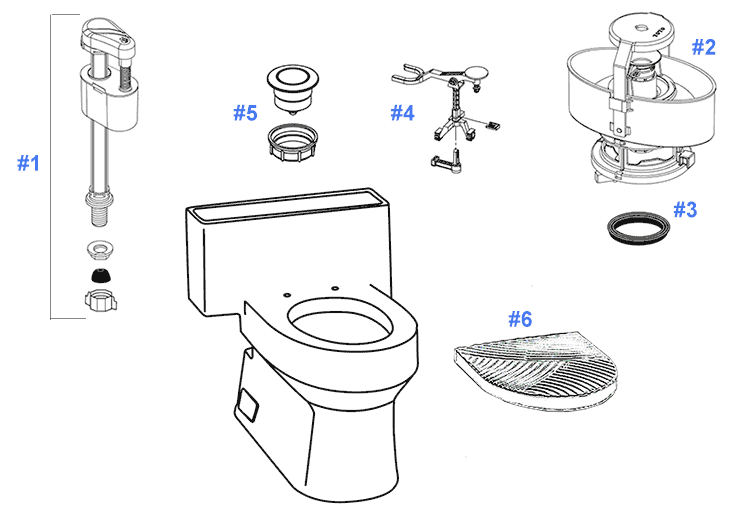
Toto Ryohan Toilet Replacement Parts
Disconnect water float valve from the stabilising frame. First push the latch up (1) and while holding the latch, slide the float valve towards the center (2). 8. Remove the float valve from the cistern. Do it while turning it along with pulling it out. Grohe Remove the float valve step a. a.

toilet flush mechanism diagram, toilet flush mechanism ...
We begin this operation by pushing the flush button, which is connected by a cable to the flush valve. This works in much the same way as the brake on a bicycle. When you hold the brakes, the cable pulls the brake pads against the wheels. In the same way, when you flush the toilet, the cable pulls the flush valve and lifts it up.
.jpg)
Gap Double Flush(Push Button System Internal Mechanism ...
There's a good chance that the toilet handle is the only part of the toilet that you have interacted with. In any case, this is the only part of a toilet's mechanism that is visible from the outside. The toilet flush handle is simple the small tank lever that you push whenever you want to flush the toilet. The trip lever

Repairing A Toilet Silent Fill Valve - Helpful Colin
Push the button on the top of the actuator handle box and release the box and cable from the tank lever thread. Remove the lock nut from toilet handle thread; this is a reverse threaded nut, turn nut counterclockwise to release the nut. Remove the toilet handle from the front of the tank.
toilet cistern flush mechanism, toilet cistern flush ...
FLUSH BUTTON: The flush button has been factory assembled in the tank lid. Secure the flush button mechanism into the tank lid by hand tightening the lock nut. The bottom of the push rod(s) leading from the flush buttons should be slightly backed off from the top of the flush valve.

dual flush toilet mechanism diagrams, dual flush toilet ...
The diagram on the projects section will only be of any use to you if the innards you have look like that one. I'm afraid there are many on the market now and that is only one example However it sounds as though the problem lies with the inlet valve whatever the shape / size of the flush mechanism. It sounds as though the float is not correctly ...

push button flush diagram, push button flush diagram ...
Handle: Located outside the tank, this is used to manually flush the toilet. On dual flush models, the flush handle is sometimes replaced by two buttons on top of the toilet tank. Supply line: This connects the water supply to the toilet, usually at the base of the toilet tank, and allows for proper flushing.
wall media net: Mechanism For Toilet Flush
Push rod is too short. 4.Flush valve body is stuck. 3.Flush valve seat does not fit on the flush valve body. 1.Incorrect installation. No flush, low flush or half flush volume Problem Leakage 3.Install again, ensuring both surfaces are clean for a water tight seal. Reason Solution Adjust the push rod length. (see page 4) 2: Flush Valve installation

Sandringham Plus Cistern Bottom Inlet Dual Flush Button ...
Toilet repair & fittings. We stock a comprehensive range of toilet spares and fittings from leading brands. Toilets go through an awful lot of wear and tear so it's important to keep all the internal mechanisms working correctly. Should you ever need to replace your toilet flush, ball fill valve or toilet handle, then our selection of products ...
Cistern Toilet Repair - Push Button Valve Dual Flush ...
There are many toilet designs; however, most function simply through the natural forces of gravity and a change in pressure. Typically, a toilet will consist of a tank that acts as a storage reservoir for water. Controlling the flow of water to and from the tank is accomplished by using a fill valve and a flush valve.

Diagram Of A Toilet - General Wiring Diagram
A push button toilet flush can also reduce water consumption and minimise water bills. The range includes buttons designed to fit most popular toilet brands and some lesser-known systems. With a greater surface area, they're easier to clean than standard fittings and are quick and easy to fit. Sort by ...

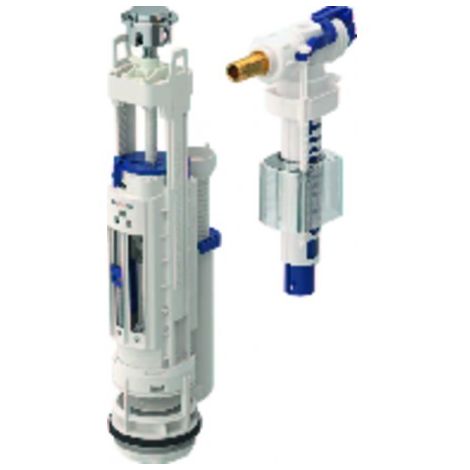
Fluidmaster Dual Flush Push Button Valve
Check the push button toilet flush mechanism diagram for further details. For Water Leakage in the Bowl. This problem occurs if the flush rod is not hitting fully over the tank lid for full flush or the chain is too long. It would be best if you used the cutting pliers to cut the chain length and leave a little part for the flapper to close well.

How to fix a push button cistern that does not flush ...
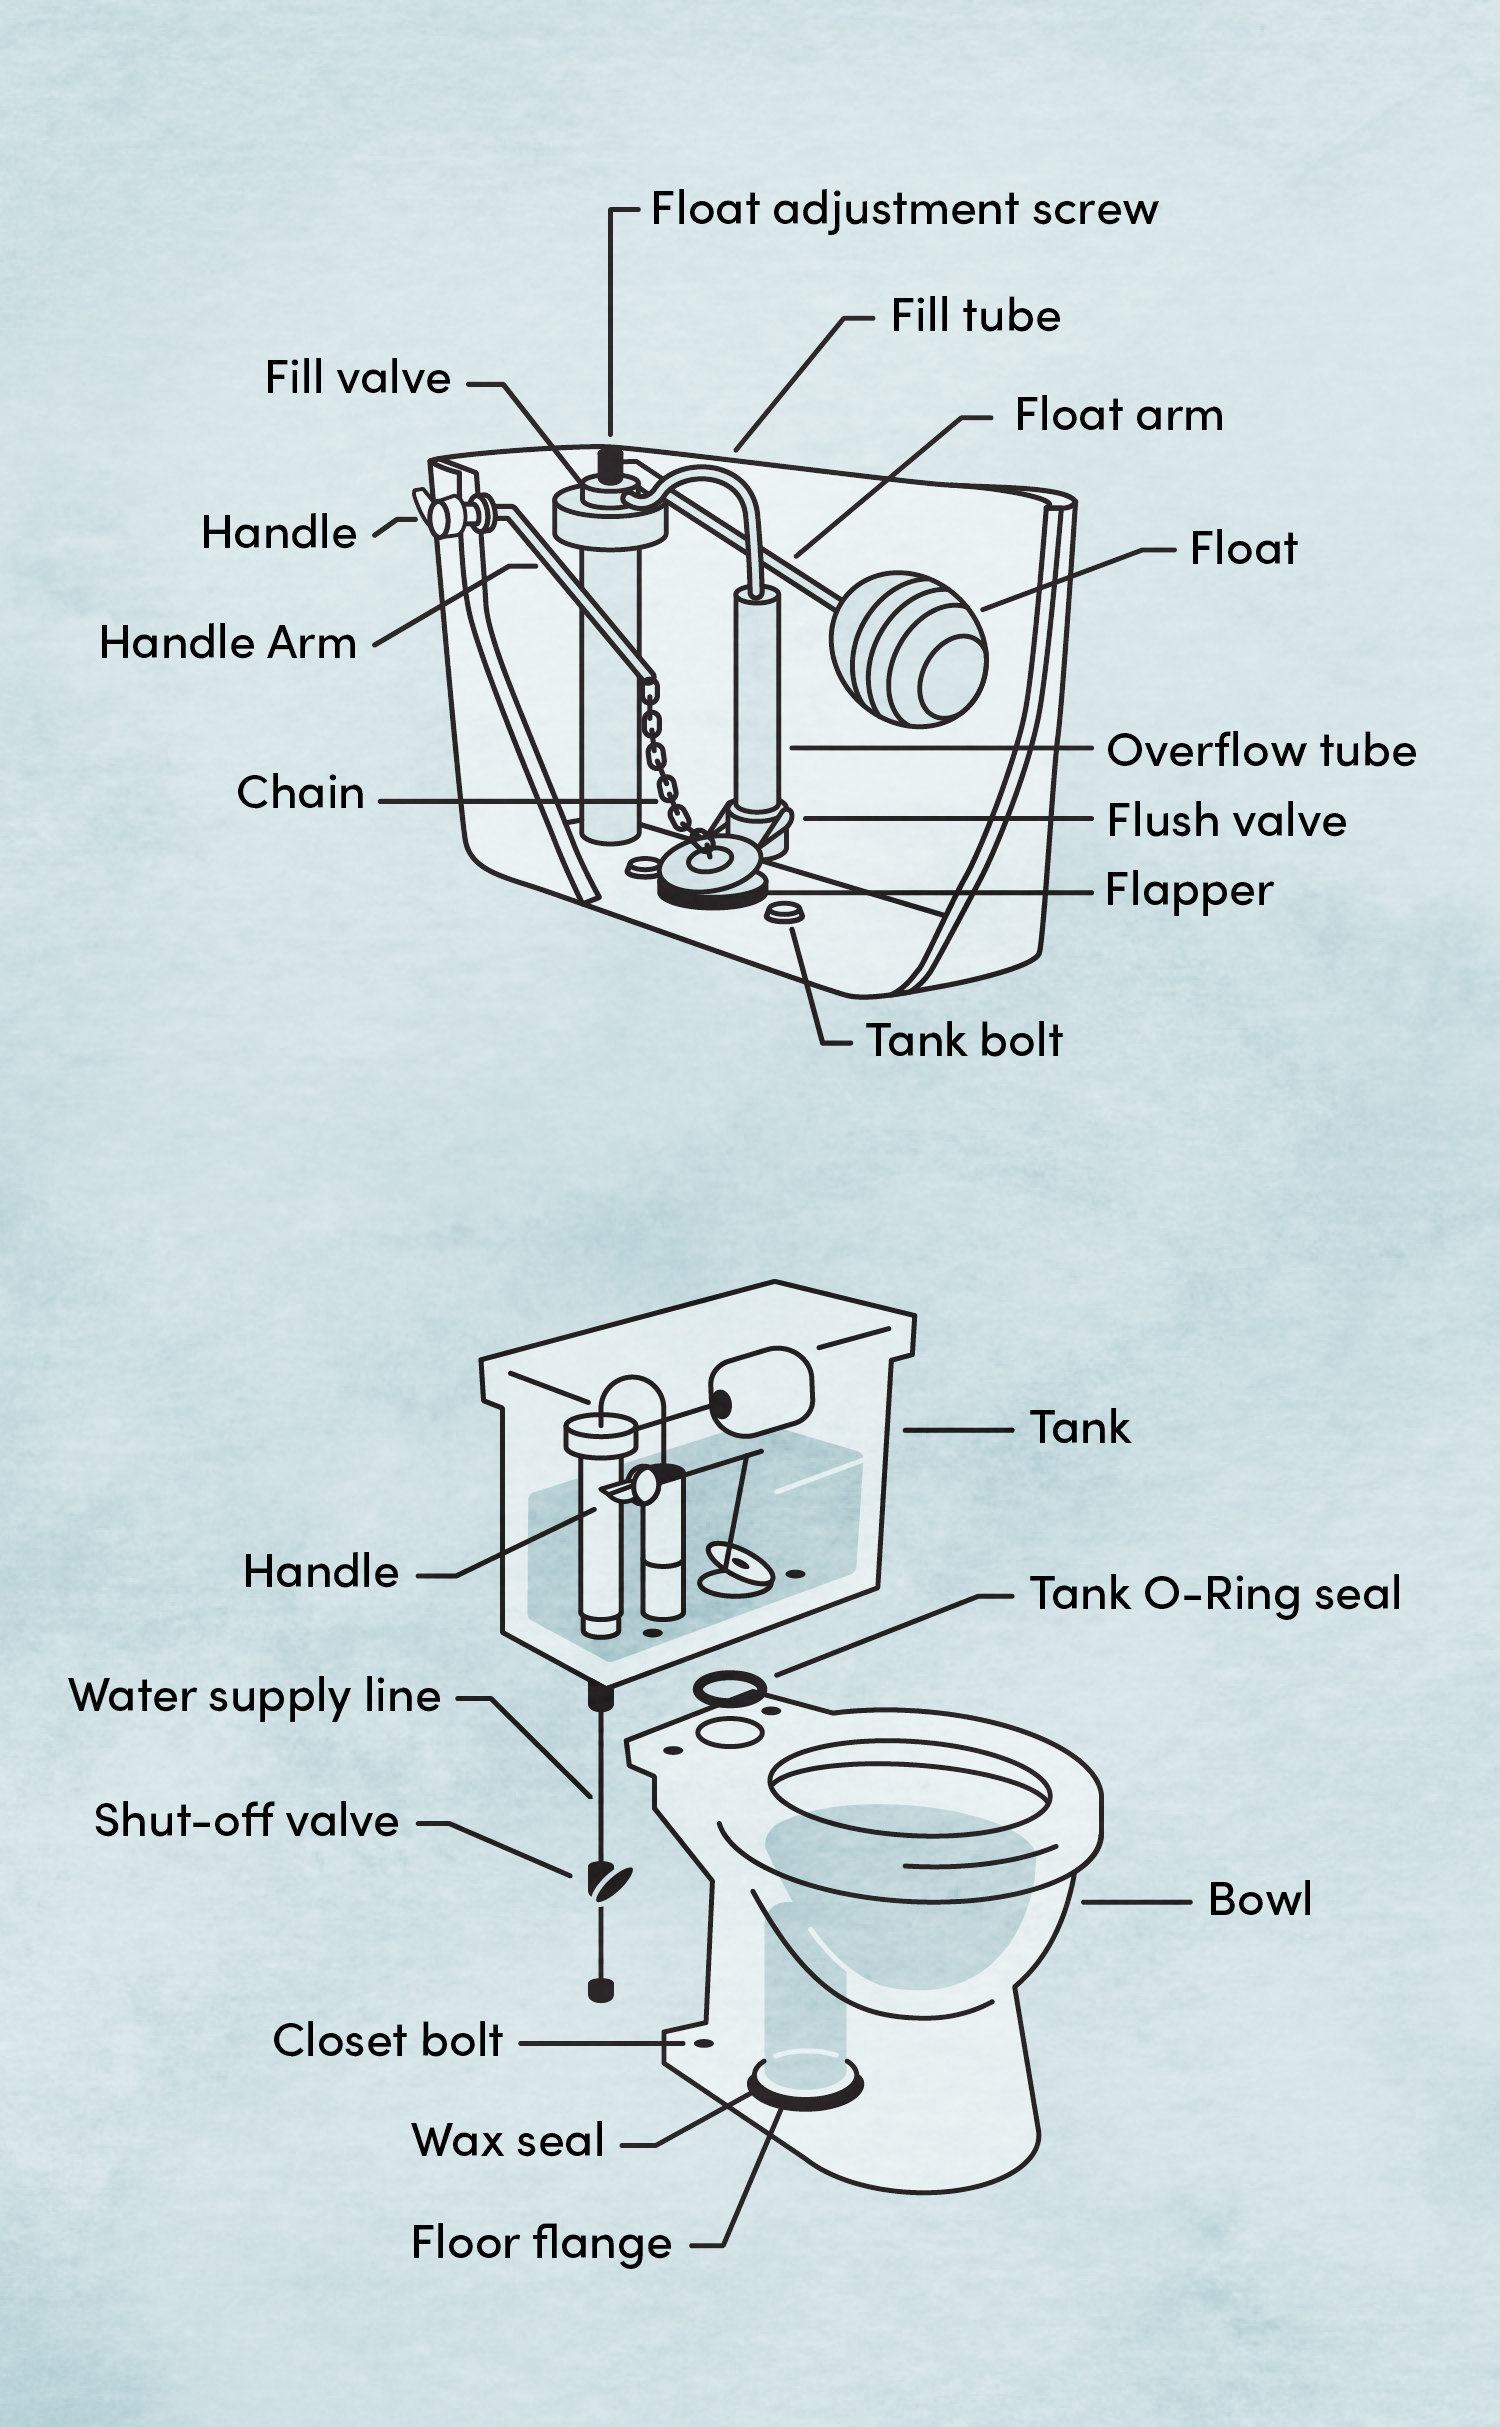
Diagram Of A Toilet - General Wiring Diagram
skincare products in glass shower with plants
Dual Flush Toilet Diagram - Diagram Media
Toilet flush mechanism
Toilet flush valves | Concealed toilet flush valves ...

Fixing Constantly Running Dual Flush Toilet By Replacing ...

Replacing the sealing washer on the outlet valve of your ...

Patent EP1498553A1 - Dual-flush pneumatic push button for ...

How toilets work - Explain that Stuff

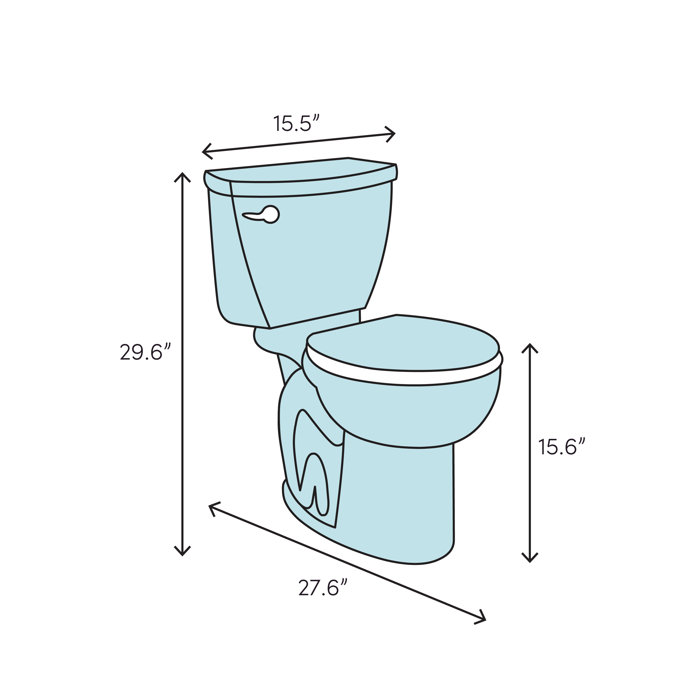
Barnum Dual-Flush Corner Toilet with Seat - Bathroom
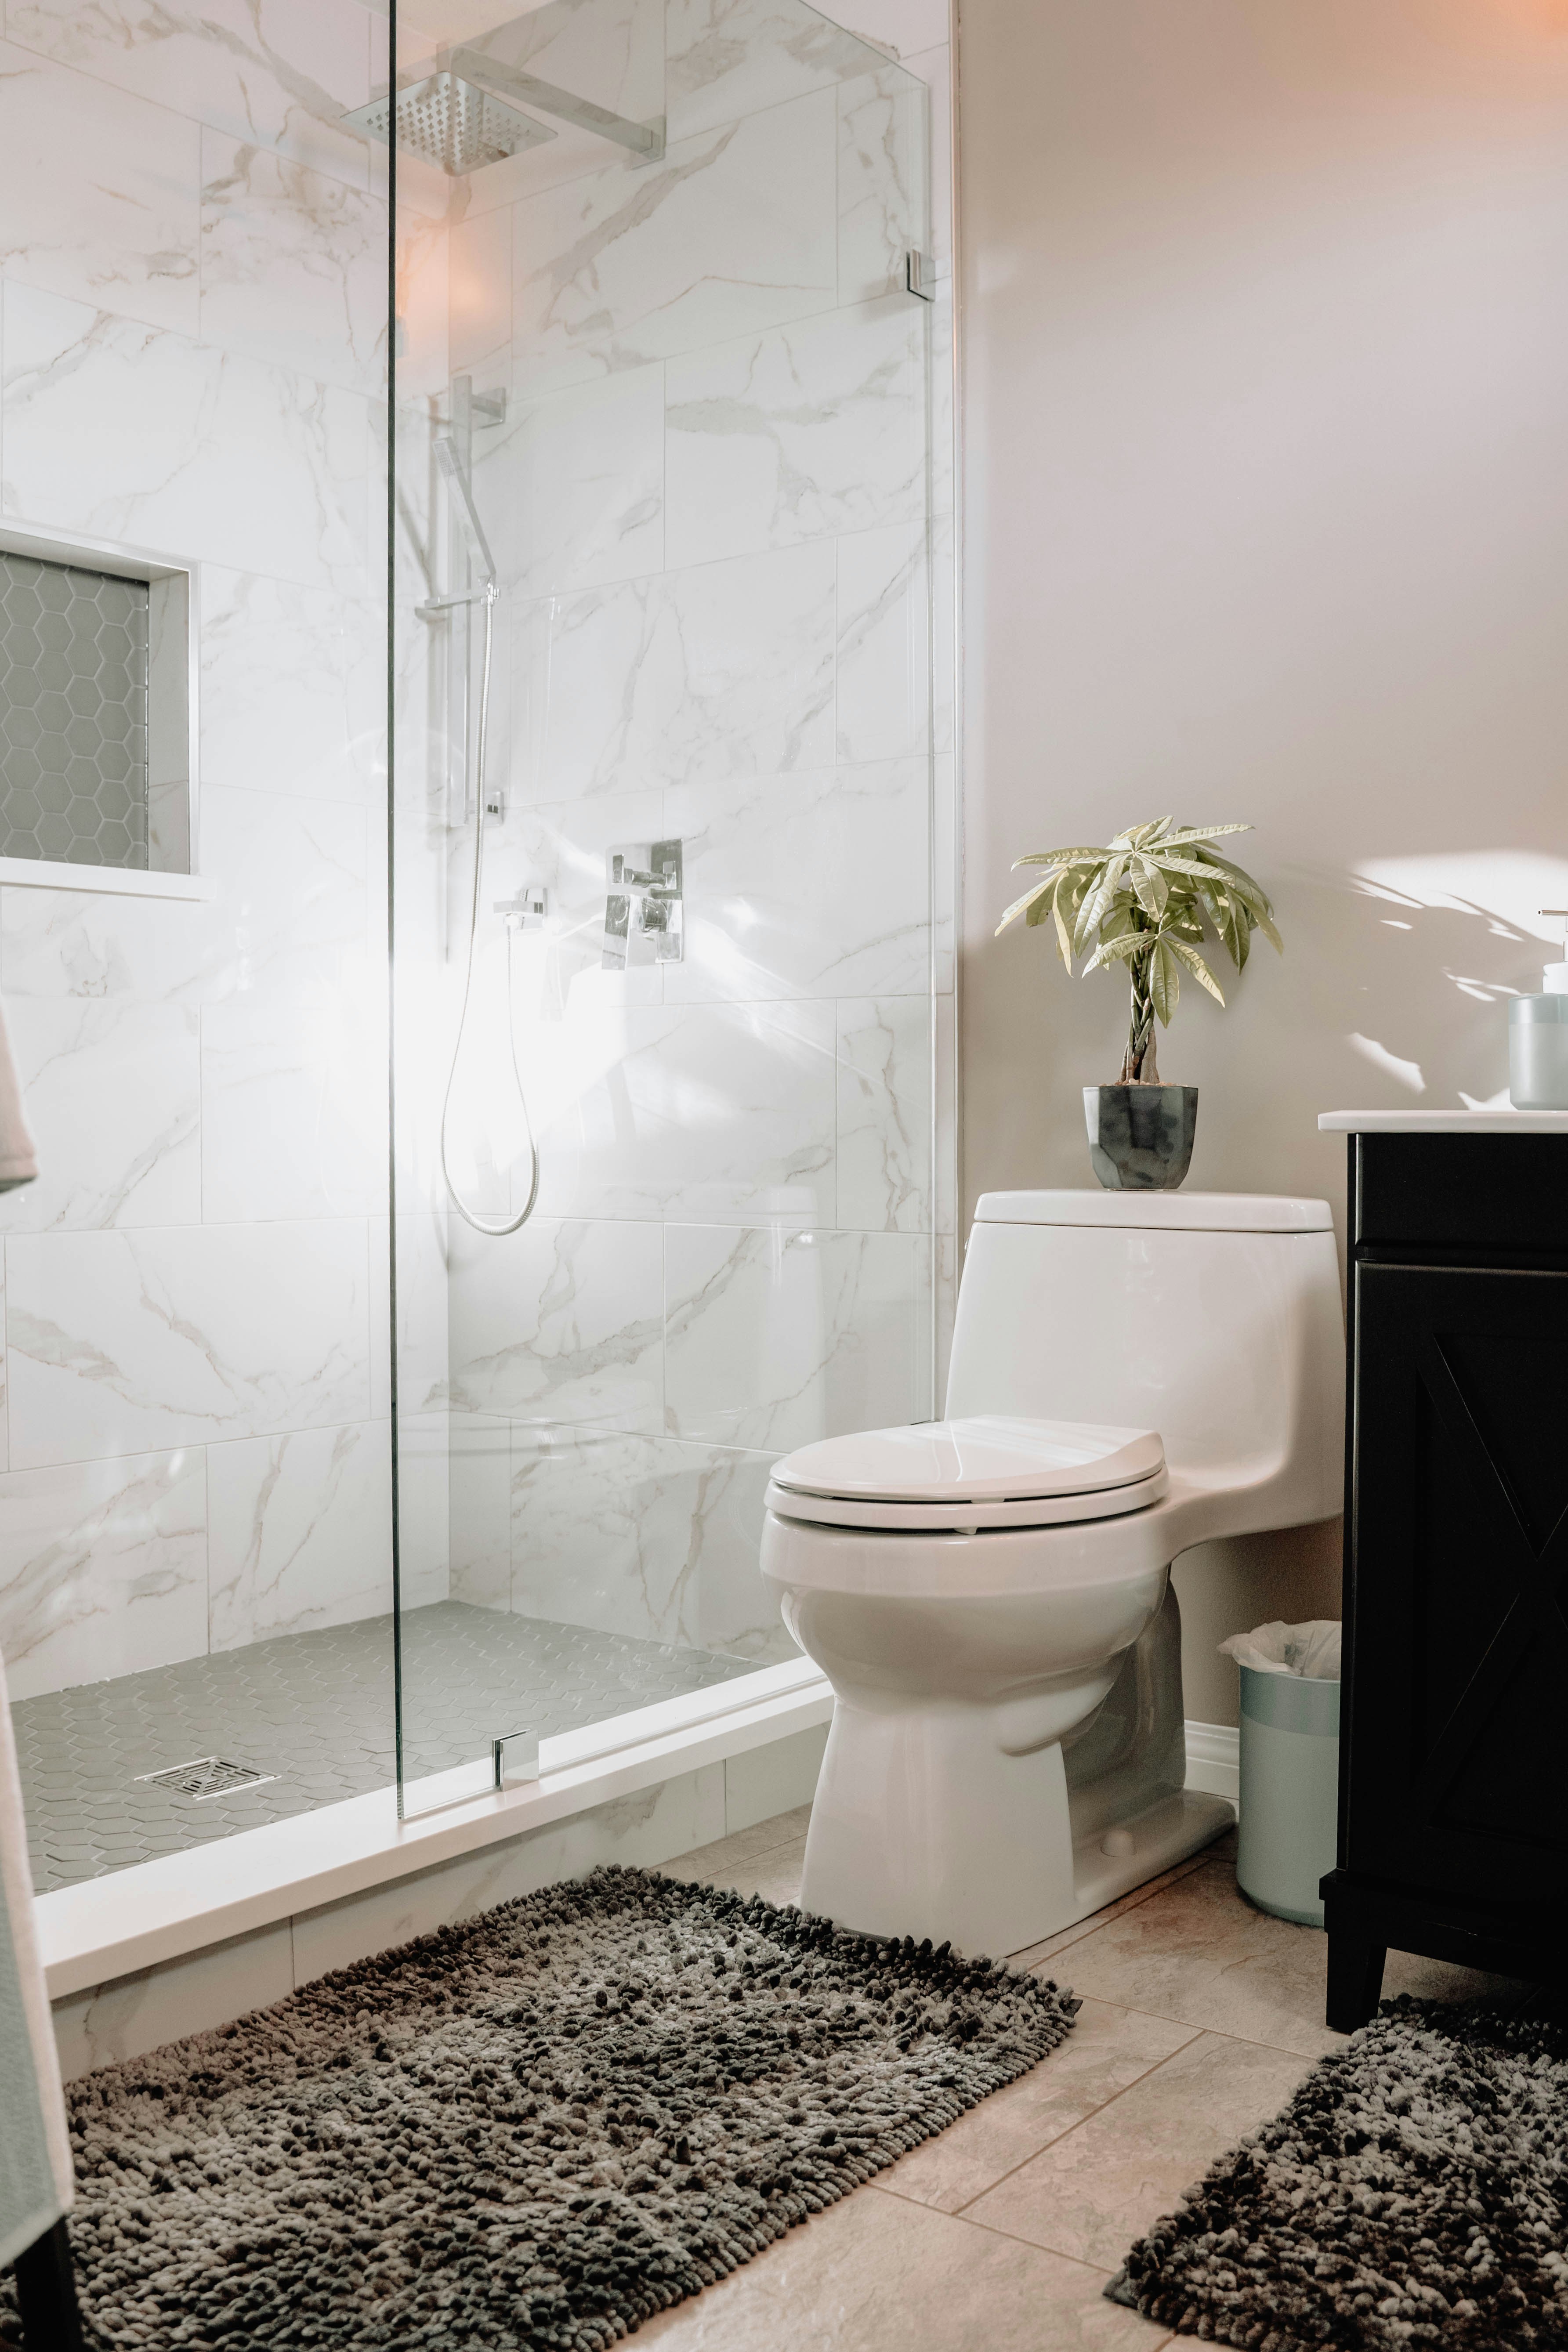
My mom's renovated bathroom

Push Button Toilet Cistern | European Toilet Cistern ...

Toilet cistern plastic...name please! - MoneySavingExpert ...

Toilet Flush Mechanism Fill Valve Flush Valve Push Button ...
Cable Control Toilet Dual Flush Valve Toilet Inlet Valve ...
Why is there a partition on the flush button? - Quora

Dual Flush Toilet Diagram - Diagram Media
How to renew the flush syphon without removing the cistern ...
Dual Flush Toilet Diagram - Diagram Media

Installing a close coupled flush valve \ push button ...

Caroma toilet water level | Terry Love Plumbing & Remodel ...
0 Response to "37 push button toilet flush mechanism diagram"
Post a Comment